Showing posts with label Equipment. Show all posts

Unlock Your Arm Potential: Effective Muscle Building Tool for Arms

Are you looking to carve out impressive, muscular arms and increase the size of your biceps and triceps? Whether you're a gym enthusiast or prefer working out at home, there are arm muscle building solutions for you. 

In this post, I'll explore the process of building your upper arms to help you achieve your arm-building goals.

The Proper Tools to Build Your Arms 

Gym memberships offer a treasure trove of equipment, making it convenient to focus on different muscle groups effortlessly. Free weights provide versatility and overall muscle building benefits and specific arm building tools offer a distinct advantage when it comes to stimulating muscle growth in your arms. 

But effective arm workouts sometimes require implements to target the desired muscle group; in this case I’m referring to the biceps. 

Tailoring Your Arm Workouts 

If you’re struggling to develop your biceps, arm muscle building solutions are within your reach. Remember that an approach targeting biceps will yield the best results. Develop a personalized workout routine that aligns with your bodybuilding goals and preferences, and you'll be well on your way to big, powerful arms. 

The Power of Targeted Arm Workouts 

Before I explore one of the best bicep building tools, it's important to understand the significance of targeted arm workouts. Building strong and defined arms not only boosts your physical strength but also enhances your overall appearance. 

Well-defined biceps can give you the confidence to wear sleeveless shirts and shirts that make your arms look bigger.

Bodybuilding is an art form, and like any art, it relies on principles and techniques to achieve mastery. One such fundamental principle is the Principle of Specificity, as described in detail in Renaissance Periodization's Scientific Principles of Hypertrophy Traininga cornerstone of successful bodybuilding.

Let’s explore how it guides the training process and leads to significant gains in muscle mass and strength. 

Understanding the Principle of Specificity 

The Principle of Specificity, often referred to as the Specific Adaptation to Imposed Demands (SAID) principle, revolves around the concept that the body adapts specifically to the demands placed upon it during training. This means that to achieve desired results, your training regimen must align closely with your goals. 

For instance, if your aim is to build large biceps muscles, focusing primarily on leg exercises won't yield optimal results. The principle dictates that you should target your biceps with curl variations, including Arm Blaster curls

The Science Behind Specificity  

To appreciate the science behind specificity, let's look at some key aspects: 

Muscle Fiber Type: Different muscle groups consist of varying proportions of muscle fiber types, such as fast-twitch and slow-twitch fibers. Specific exercises activate these fibers differently. Tailoring your workout to the muscle's fiber type composition ensures maximum growth (1). 

Neuromuscular Adaptations: Specific training improves neuromuscular coordination, enhancing the mind-muscle connection and optimizing motor unit recruitment (2). 

Energy Systems: Targeted training aligns with the energy systems predominantly used by specific muscle groups. For example, endurance training focuses on oxidative pathways, while strength training taps into anaerobic energy systems (3). 

Exercise Selection: Specificity influences exercise selection. Compound exercises, such as deadlifts and bench presses, engage multiple muscle groups, while isolation exercises zero in on particular muscles (4). 

Implementing Specificity in Your Bodybuilding Routine 

Set Clear Goals: Define your bodybuilding goals, whether it's bulking up, toning, or improving strength. 

Design Targeted Workouts: Craft workout routines that align with your goals. Incorporate exercises that prioritize the muscle groups you intend to develop. 

Vary Intensity and Volume: Adjust training intensity (load) and volume (reps and sets) according to your objectives. For strength, go heavy with lower reps; for hypertrophy, use moderate weights with higher reps. 

Track Progress: Keep meticulous records of your workouts, including weights lifted and repetitions. This data helps you monitor your progress and make necessary adjustments. 

Periodization: Implement periodization, where you cycle through phases of training intensity and volume. This prevents plateaus and encourages continuous adaptation (5). 

The Principle of Specificity is not just a guideline; it's the roadmap to success in bodybuilding. By tailoring your training to your specific goals and understanding the underlying science, you can maximize muscle growth, the biceps in this case. 

Arm Blaster Curls: The Ultimate Arm Muscle Building Solution 

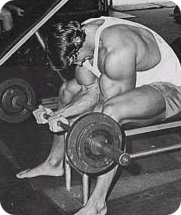
The bicep building solution – Arm Blaster curls. This unique device, once used by the legendary Arnold Schwarzenegger, can help you sculpt mind-blowing biceps that leave a lasting impression. It isolates your biceps during curls, ensuring maximum muscle engagement and growth. It's like having a personal trainer for your arms. 

Unveiling the Arm Blaster 

The Arm Blaster is a compact, cost-effective, and lightweight tool designed to revolutionize your arm workouts. By incorporating Arm Blaster curls into your routine, you can quickly develop full, well-defined biceps that stand out. 

The Science Behind Arm Blaster Curls 

What sets the Arm Blaster apart is its ability to maintain precise arm positioning during standing curls. The classic barbell curl, known for building overall bicep thickness and muscle size, becomes even more potent with the Arm Blaster. 

This remarkable tool maximizes muscle growth at the lower part of your biceps, where they are most visible. It's the key to achieving that sought-after thick and full look just above the forearm. Imagine confidently sporting a short-sleeved shirt and showcasing your impressive biceps. 

The Importance of Lower Biceps 

Small, slender lower biceps can diminish the overall impact of your arm development. Regardless of measurements, it's essential to cultivate big, thick, and full lower biceps to create the illusion of massive arms. Arm Blaster curls are your ticket to this transformative look. 

Why Arm Blaster Curls Are Superior 

In my opinion, Arm Blaster curls reign supreme when it comes to enhancing the appearance of your biceps and building muscular arms. Even compared to preacher curls, Arm Blaster curls take the crown for effectiveness. 

Convenience and Accessibility 

One of the best aspects of the Arm Blaster is its affordability, portability, and compact size. You can easily carry it in your gym bag and perform Arm Blaster curls wherever you have room for a curling movement.

Whether you're at home, in a commercial gym, at work, or any suitable location, the Arm Blaster is ready to help you sculpt your dream arms. 

Don't Miss Out on Arm Blaster Curls 

Incorporating Arm Blaster curls into your arm-building workout routine will unlock incredible growth potential and accelerates the development of bigger, more muscular biceps. Don't underestimate the power of Arm Blaster curls in enhancing the appearance of your arms. 

Arm Blaster curls are your gateway to achieving those impressive, eye-catching biceps you've always wanted. Embrace this muscle building tool, and watch your arms transform into a true testament to your dedication and hard work. 

Start Your Arm Transformation Today 

Your journey to stronger, more defined arms begins with the right muscle building tools. The Arm Blaster is a tool and your arm workout solution and is available on Amazon.

Don't wait any longer—get your Arm Blaster at my Amazon affiliate link here and take the first step towards achieving your arm muscle building goals. Your dream arms await!

Also Read:

The Science of Building Big Arms: A How-To Guide  

2 Must-Read Muscle Building Books to Add to Your Library

Compelling Review of Creatine Monohydrate for Muscle Building 

References: 

Wackerhage, H., et al. (2019). Stimuli and sensors that initiate skeletal muscle hypertrophy following resistance exercise. Journal of Applied Physiology, 126(1), 30-43. 

Sale, D. G. (1988). Neural adaptation to resistance training. Medicine and Science in Sports and Exercise, 20(5 Suppl), S135-145. 

Plisk, S. S., & Stone, M. H. (2003). Periodization strategies. Strength and Conditioning Journal, 25(6), 19-37. 

Schoenfeld, B. J. (2010). The mechanisms of muscle hypertrophy and their application to resistance training. Journal of Strength and Conditioning Research, 24(10), 2857-2872. 

Issurin, V. B. (2010). New horizons for the methodology and physiology of training periodization. Sports Medicine, 40(3), 189-206.

How to Save Money, Time and Energy on a Home Gym

Being an enthusiast of all things muscle, one of the most frequent topics of conversation among my friends and coworkers is working out and resistance training. 

Those who know me best are aware of the gym that I built in my home’s two car garage several years ago. 

I am frequently asked if the monetary investment was worth it, if I work out as often as I had originally intended and if I am able to get as good a workout with my home gym equipment as I had in a commercial gym.

Below I will discuss the pros and cons of having a home gym, the worth of the financial investment a definitive answer to the question “It is worth it."

TLDR (Too Long Didn't Read): My Amazon Powertec home workout equipment recommendation page.

Background

First, I’ll give you a little background.  Like most of my readers, I have been lifting weights and exercising regularly in some form or fashion since I was a teenager.  

My first love was bodybuilding.  Admittedly, my desire to increase my muscularity and definition was greatly influenced by my desire to attract those of the opposite gender, which in my case were females.

I learned very early on that incorporation of squats and deadlifts into my workout program was of utmost importance in my quest for aesthetic muscle.  As my body grew, I became increasingly passionate about muscle building and decided to devote every free moment to bodybuilding research and planning. 

It wasn’t long before I became a certified personal trainer and later spent many years helping others achieve their fitness goals.  Ultimately, I held a middle management position at a major commercial gym and had the authority to select and purchase exercise equipment and accessories. I also consult a major police department on the design and layout of their fitness center and fitness and wellness program.

Through the training and experience I gained from my years in the fitness industry and the 15 years as a competitive powerlifter and strength coach, I learned a great deal about the quality and effectiveness of most of the workout and exercise equipment that is on the market. 

I used this expertise to build my dream gym in my home’s two car garage.  The gym is complete with a power cage with dip and chin stations, lat pull-down tower with high and low cables, Texas Power Bar, Jump Stretch bands, chains, various cable attachments and nearly one thousand pounds worth of Olympic plates. 

I put a lot of thought, time and research in developing my gym.  First, I had to purchase my equipment from a manufacturer with sturdy, reliable equipment that backed their products with a warranty. 

The power cage had to accommodate and withstand heavy loads and it had to have the ability to be secured to the floor and not rock when hundreds of pounds of iron are thrown on the rack after a set of squats. 

Additionally, the holes that accommodate the safety bars had to be in fairly small increments for optimal height selection for floor presses, lock outs and rack pulls. 

Second, I had to consider cost consistent with quality.  I knew from my years in gym management that gym equipment manufacturers often rely on their brand name to establish their prices.  

I needed a reputable company that produced quality equipment at an affordable price.  I conducted a cost/benefit analysis and determined a price range that I was comfortable with.  Below is an example of the formula that I used:

(G) Commercial Gym Membership = $55 per month

(F) Fuel and Vehicle Mileage Travelling to Commercial Gym = $40 per month

(T) Tolls on Route to Commercial Gym = $16 per month

G+F+T = $111 per month x 12 months = $1,332

I was spending $1,332 per year on average traveling to my commercial gym and maintaining my membership.  I considered the fact that I generally only used their power cage, bench and dumbbells therefore the benefit of various types of equipment really didn’t weigh much into my decision making process. 

At the time, I expected that I would still be a muscle devotee for at least five more years (likely many, many more) but for the purposes of my calculation I used five years in my calculation.  The result looked something like this:

$1,332 per year x 5 years = $6,660

I was likely to spend well over $6000 over the next five years maintaining my gym membership and travelling to work out five times per week. 

I felt that calculation alone justified investing in a home gym.  I was confident that I could purchase high quality gym equipment for less than that.

Cost

For me, the most important component to my home gym was a power cage, also called a power rack.  If I could do no other exercise, I knew I needed to squat.  

Having my own heavy duty power cage would allow me to squat and perform other big movements like bench presses and shoulder presses.  So, my research began with and centered on a power cage. 

I determined that the prices of power cages ranged in price from about $400 to over $1000.  I was instantly able to spot those that were of inferior quality by the slender uprights and inadequate width and depth.  

Some of the higher quality power racks were built for heavy commercial gym use, something that I did not require as only a few people would regularly use my equipment. 

After hours of Internet research, phone calls to equipment dealers and professional contacts and price comparison analysis, I settled on a sturdy power cage built for light commercial gym use.

The best, lowest price workout equipment was developed and manufactured with enough strength and durability to accommodate constant use at a commercial gym with limited traffic and use. 

Now, I’m a big guy who needs some room to maneuver.  I settled on a Powertec power rack $900 and could be delivered with no charge for shipping. 

As an added benefit, the power cage came with a chin and dip station, which eliminated the necessity, and cost, of have to purchase them separately.

Of course, to get the most out of my power rack, I would need to shop for a quality bench, preferably with the ability to adjust to different degrees of incline.  My bench needed to be wide and sturdy and have enough stability to prevent me from falling over when performing heavy bench presses. 

My search for a bench was almost as extensive as my power cage search.  I again found a pretty wide price range for adjustable benches.  

They were generally priced between $100 and $400 and varied in quality. After extensive research, I came full circle and settled on a Powertec utility bench.  Not only did it meet all of my preferences, the bench was designed for special Powertec attachments for a preacher curl bench, leg extension, leg curl and my favorite - a weighted dip attachment. 

In the end, I paid about three hundred bucks for my bench, not including any attachments.

Affordable Olympic Weight Set
Of course I needed a bar and plate weights so first I purchased a specialty Olympic barbell.  

I did some shopping around and ended up buying two 300 lb. Olympic sets to start.  That gave me a total of three bars and, after adding a couple hundred extra pounds worth of plate weights, nearly 1000 pounds of iron to throw around. 

These are the basics.  Over the years I’ve purchased attachments for my Powertec utility bench and other implements, but the above equipment was enough to keep me content and allowed me to confidently perform my favorite movements including:

  •  Heavy Squats
  • Heavy Rack Pulls
  • Heavy Bench Presses
  • Heavy Overhead Presses
  • Chin Ups
  • Dips
  • Floor Presses
  • Pin Presses
  • Squat Lockout 
  • Heavy Shrugs
  • Heavy Rows
My initial cost to build a gym in my home’s two car garage = $2,300.

Cons

Assembly- Although the assembly instructions included in the equipment packaging was simple and easy to understand, it took the better part of an afternoon putting together the power cage and utility bench. 

The reason I list this as a con is because I was eager to get started with my new equipment and by the time I put it together I did not have time to use it due to a scheduled obligation. 

Space Requirements – I have a fairly large two car garage.  While I am still able to park my two full-sized sedans inside, there is no extra room.  The vehicles must be removed for me to use the equipment. 

Pros

Cost – My initial cost for my gym was approximately the same as two years’ worth of my gym membership and travel expenses.  I broke even on my investment three years sooner than I had originally anticipated. 

Time – I have saved about three hours per week by working out in my home gym.  I no longer have to pack my gym bag, drive to the gym and go through the check in process when I arrive. I have almost no excuse to miss a workout.

This point alone has prevented me from missing a lot  of workouts over the years that I may have missed otherwise due to no motivation to exercise, time or slight fatigue. 

Convenience – I can lift whenever I want, for as much time as I want.  There have been many occasions when I’ve woken up in the middle of the night, walked into the garage and banged out a couple quick sets, as long as the cars weren’t parked in the way.

I am also able to get some chores done between sets on days that don’t require my complete concentration in the gym. 

Lack of Distractions – My biggest gripe with commercial gyms are all of the distractions.  I do not like to talk to anyone except my partner while I am lifting.  The music is usually terrible and there is invariably someone curling in the squat rack.  In my home gym I don’t have to talk to anyone, I can select the music that I like and I don't have to wait for machines to be available. 

Is It Worth It?

Yes, without a doubt.  The benefit of cost, time savings, convenience and ability to manage time more efficiently are the primary reasons that I confidently make this statement. 

I can also tell you that my equipment has not become “an expensive clothes hanger” and I still use it regularly.  I am able to move big weight like I did in the commercial gym and perform as well, or better, in my home gym. 

Recommendation


Home power rack

Having used and been extremely satisfied with my Powertec power rack and Powertec utility bench, I felt compelled to write this article. 

I have been endorsing these two products for a long time to friends and family members.  I have used dozens of power racks and weight benches over my lifting career and these two pieces rank among the best.  They are the foundation of my home gym and I continue to add accessories and attachments which add to their benefit.

These pieces of equipment and other affordable home gym equipment is available from Powertec on Amazon.com, which provides fast, easy processing of orders. 

In the interest of full disclosure, if you purchase these pieces of equipment or anything else using the links I’ve included on this page, I may receive a monetary commission.  Therefore, I would greatly appreciate it if, and when, you decide to make this investment that you use the links included on this page. 

Fitness Reality Gym Plate Weight Rack Recommendation

Fitness Reality Plate Tree
Home gyms, personal training studios and small commercial gyms are being used more often by more people. Problem is that some people who perform resistance training exercises do not understand proper gym etiquette. 

Weights Need to Be Racked

What I’ve seen a lot over the years is weights (especially plate weights) are not being placed on racks when they are not being used. Plate weights are often leaned against gym walls and machines, which is unsafe and causes unnecessary wear-and-tear. 

Also, without enough plate weight racks, the weights are sometimes left on machines and bars after use. This practice is violates standard gym etiquette and is unfair to others who have to unload the weights when they want to use the equipment. The risk of injury is increased when heavy plates have to be unloaded by some by fellow gymgoers.   

Solution 

A simple solution to this problem is the addition of quality plate weight racks in personal training studios, home gyms or small fitness centers. One or more of the best plate weight racks can could be placed in exercise areas to help avoid this problem. 

I’ve done extensive research and I’ve found the best plate weight rack that meets this need and is reasonably priced. 

Weight Rack Benefits and Recommendation

The product is a Fitness Reality Olympic plate weight rack and bar holder (Amazon affiliate link) and I've placed two of these racks in the fitness center that I manage. 

Some of the most beneficial features of this high quality plate weight rack are:

Fitness Reality Weight Rack
  • Holds eight 45-pound plates
  • Holds eight 25-pound plates
  • Holds ten 5 and 10-pound plates
  • Holds two full size Olympic bars

Most other fitness product brands' racks hold fewer plate weights and do not have the option to safely secure Olympic bars. With gym floor space at a premium, adding one or more of the Fitness Realty Olympic weight trees/plate racks is a logical choice. 

Where to Buy Your Rack

The cost is very reasonable and the Fitness Reality plate weight racks are available here at Amazon (affiliate link). Even though I may receive a small monetary commission if you purchase the rack from the link in this post, I strongly recommend this sturdy Olympic plate weight rack from Fitness Reality. 

If you have a home gym or own or manage a small fitness center or personal training studio, take a look at the Fitness Reality Olympic plate weight racks and bar holder combo. 

*Please note that if you make a purchase using any of the Amazon affiliate links in this post, I may receive a monetary commission.

Also Read:

Discover the Ultimate Sturdy Home Rowing Machine: Your Path to Weightloss Success

Seven Reasons Not to Skip Today's Workout

Fitbit Alta: A Compelling Review

What Muscle Makes the Forearm Look Big?

Brachioradialis Forearm Muscle
Here is my Amazon affiliate link to the leverage bar, a valuable tool in targeting the muscle that makes the forearm look big and muscular. 

There is no doubt that a well-developed set of massively muscular forearms instantly evokes admiration and awe from onlookers and anyone who appreciates a well-built physique. 

Unfortunately, many lifters waste precious time and energy pursuing big forearms by doing compound exercises that don’t necessarily target the muscle that makes the forearm look big. 

Are You Guilty of Any of These Five Gym Etiquette Violations?

Grandma wagging her finger
We would all like to be able to work out at our favorite gym without having to endure the inconsideration and lack of adherence to established gym etiquette by some selfish gym member.

Unfortunately, most of us experience violations of gym etiquette to some degree just about every time we hit the gym.  The question is, have you ever been guilty of violating any one of these most commonly accepted rules of gym etiquette?

Not Allowing Someone to Work In

It is common courtesy to let someone work in on a machine, bench or weight station between your sets.  The concept of working in simply means that you allow others to perform a set of exercise at the same spot as you while you are taking a rest between your sets. 

This does not mean that you have to advertise the fact that you are resting and anybody can just step right in, but if someone politely asks to work in, let them.  On the same token, don’t be afraid to ask to work in if a machine or weight station you want to use is occupied.
Bodybuilder reading newspaper on gym equipment

Hogging the Equipment

Hogging gym equipment is different than not allowing someone to work in.  It means camping out on a weight bench, machine or weight station without acknowledging or even considering the presence of others.

This violation is especially frustrating when the violators gym bag, towel, water bottle and other implements take up a lot of space and cause people to step over and around their property. 

Not Cleaning Up After Yourself

Nothing is more disgusting and unsanitary than using a piece of gym equipment with sweat all over it.  Most gyms have paper towels or sanitary wipes to be wiped down equipment after use.  Equipment should be wiped clean of sweat every time you are done with it. 

If the gym does not provide paper towels or wipes, bring your own or place a towel on the equipment while you’re using it to prevent sweating all over it.

This rule also applies when using gym chalk.  As I explained in the article Gold's Gym Myrtle Beach: My Experience, some gym owners despise the use of chalk in their gyms.  Respect the rules of the management and staff and don't throw chalk all over the place just for the sake of being cool. 

Being Bothersome

I don’t know about you but I don’t like it when people make conversation or are generally obnoxious in the gym.  I go to the gym to lift, not chit chat.  Even if I’m with my lifting partner, the conversation topic is limited to the task at hand. 

Don’t bother someone with questions, or even compliments.  It’s distracting and likely annoys whoever is being spoken to.  And for heaven’s sake, don’t try to find a date at the gym.  
Heavy dumbbells scattered on the gym floor

Not Racking Your Weights

Nobody wants to unload your barbells or put away the dumbbells you left on the floor.  Not only is it simply discourteous to leave your weights on the bars and dumbbells on the floor, it’s dangerous.

I have seen more than a few people trip on weights, drop heavy dumbbells and flip barbells off of a rack taking plates off of the bar.  Don’t be the person who is responsible for someone injuring themselves adding extra work to their workout picking up your discarded weights. 
  

If you find that you are a frequent violator of any of the above rules of gym etiquette, please conduct a personal analysis of your consideration for others and your level of selfishness.  If you’re like the rest of us who get frustrated with people who violate established gym etiquette, take comfort in the fact that you are not suffering alone.

I do not advocate taking aggressive action toward such individuals, but I do encourage you to initiate dialogue with them and/or notify gym management.  After all, adherence to gym etiquette by all results in a productive, positive gym experience for everyone.  

Also Read:

The Top Three Exercises to Build Large, Muscular Forearms

Building big forearm muscles is simpler than you may think. 

While the muscles of the forearms aren’t generally prone to rapid growth by using the traditional methodologies of lots of grip-building work and endless sets of wrist rollers, stimulating growth of the muscle fibers of the lower arm is possible through a focused application of three simple exercises.  

 Leverage Bar Curls

Leverage bar curls (affiliate link) are a non-traditional, profoundly effective, forearm building exercise that can performed just about anywhere.  Leverage bar curls stress the brachioradialis muscle complex so effectively that you can almost feel your forearms grow while you perform the movement. 

A full explanation on how to properly execute leverage bar curls and the forearm building protocol can be found in the article The Key to Building Big Forearms.

Hammer Curls


The second best exercise to build big forearms is much more recognizable to the muscle enthusiast. 

Hammer curls have been used by bodybuilders for decades to beef up the brachioradialis muscles and create a thick, dense set of forearms. 

Hammer curls can so effectively build the forearms that you’ll wonder why you never really gave them much attention in the past.

Proper execution and workout application techniques can be found in the article Build Big Biceps With These Three Exercises.

Barbell Wrist Curls

Wrist curls are the redheaded stepchild of forearm exercises as they are under-appreciated by hardcore meatheads but they can deliver phenomenal results. 

Variety in weight, set and rep schemes is the name of the game when building large, muscular forearms with wrist curls.

For best results, wrist curls should be performed three times per week with repetition ranges from 6 to 40.  The following variations should be included in your forearm building program:
  • Seated barbell wrist curls
  • Standing behind the back wrist curls
  • Seated dumbbell wrist curls
  • Cable wrist curls
Explosive forearm development can occur if you include these three forearm building exercises in your bodybuilding program.  Don’t be surprised if you experience some of the best forearms pumps of your life  when you combine these three exquisitely effective forearm muscle building exercises. 

Caution should be used, however.  Being overzealous and going to heavy and too intensely at first may result in overuse injury of the wrist and extreme delayed onset muscle soreness of the hands and forearms. 

As your forearm muscles adapt and grow bigger and stronger, which they will very quickly, you can crank up the volume and intensity and watch your forearms explode. 

The Value of an Affordable Activity Tracker for Health and Weight Loss

Field Running
Cardio is one of the best ways to stay in shape, lose weight and maintain heart health. 

Cardiovascular exercise does not necessarily need to include intense, complicated workouts. 

Regular exercise that elevates the heart rate for an extended period of time is what it takes to stay healthy and keep body weight in check.   

Planning, tracking and documenting the intensity level, duration and frequency of aerobic activity is an important component of an effective aerobic exercise program.  

Theses activities are among the simplest yet most beneficial forms of aerobic exercise and actively level can be easily tracked with an affordable fitness tracker. 

Jogging

Jogging is considered by many to be one of the most effective ways to lose weight and burn body fat. 

Keeping track of distance, time and number of calories burned with an activity and step tracker can help track of progress and aid in goal planning.  Using an activity tracker and keeping a distance log are simple ways to help stay on track and achieve fitness goals.   

Daily Activity

Most people don’t consider how many calories are burned every day just by performing routine tasks. This activity is referred to as NEAT - Non-exercise activity thermogenisis. 
   
Each and every step that is taken over the course of a day requires the body to burn calories.  Tracking the number of steps that are taken and the number of calories burned with a step tracker can help in establishing fitness goals and provide motivation to increase daily activity levels to lose weight. 
Bottom of running shoes

Walking

Walking is one of the best low-impact exercises for heart health.  Walking for just a half-hour, three days per week can help improve the efficiency and integrity of the cardiovascular system.  

Monitoring heart rate with a wearable fitness tracker while walking and documenting walking distance and time is an easy way to determine the effectiveness of a walking program and plan future workouts. 

Fitness experts recommend documenting and keeping track of daily activity level and food consumption.  This allows for planning workouts and meals and establishing realistic fitness goals. 

Heart rate monitoring, documenting duration of exercise and tracking the number of calories that are consumed and burned every day are important aspects of fitness programming and evaluation. 

Using a quality, affordable fitness tracker to track steps and number of calories burned is an easy way to gauge the effectiveness of an exercise program and establish fitness goals.  

Fitness enthusiasts and casual exercisers can find wearable activity trackers for this purpose online using my affiliate link to Amazon.

Also Read: 

How to Make Your Biceps Look Bigger: Arm Blaster Review

Arnold Arm Blaster

Does the Arm Blaster work to build big biceps? 

Well, the Arm Blaster is excruciatingly effective at building full, large biceps that make the entire arm look bigger.

“What you focus on grows” is a popular inspirational quote that is repeated in business seminars, sales meetings and self-help groups.  

This statement can be applied to bodybuilding, specifically building big biceps. 

It is quite literally the definition of the "Specificity Principle" as described in Renaissance Periodization's Scientific Principles of Hypertrophy Training 

This book is the most comprehensive text on developing the best muscle building programs that I have read to date. 

Look inside and preview the text here at Amazon.

Making the biceps look bigger is not just a matter of creating an optical illusion by getting a tan, shaving your arms or getting a tight haircut; it’s about actually making them bigger. 

Logic would dictate that all you have to do is few sets of curls here and there and your bicep will become bigger and stronger. 

In reality it takes a little more planning than haphazardly doing the so-called best exercises for biceps mass and size.  You have to identify what part of the upper arm you really need to look full and well developed in order to make your arms look bigger.  

The biceps are made of two separate muscles that connect at the elbow on the underside of the arm.  In order to make your entire upper arm jacked, you must perform big, compound pushing and pulling movements and isolation exercises for each of the muscles that makes up the entire biceps and triceps complex.  

Small Biceps Syndrome

However, in order to create an illusion that your biceps are bigger than they actually are, you must take the right approach to building them. 

If you have already built a decent set of arms and wear short sleeved shirts a lot, you may not be satisfied with how your arms look.  Sure they may be big based on their measurement, but the biceps just look flat and small at the bottom near the elbow. 

Never fear! There is a simple remedy to the problem of small lower biceps.  You simply need to focus on performing biceps isolation exercises through a full range of motion, paying special attention to the first half of the movement. 

Far too often we chase big, muscular biceps by doing heavy curls through a short range of motion or cheating at the bottom of the movement. 

Heavy curls certainly have their place in an overall workout program to build big biceps but you will be limited on the amount of stimulus you can put on the biceps near their insertion point at the bottom.

To fully develop the lower portion of the biceps and build the size, strength and integrity of the connective tissue, controlled, continuous tension exercises that focus on the first portion of the curl must be performed. 

Two of the most effective exercises for rapidly developing the lower portion of the biceps to make the arms look bigger are preacher curls and Arm Blaster curls. 

Preacher Curls
Preacher curls are performed on a preacher bench or other flat padded surface that the backs of the upper arms rest against while performing curls.  Preacher curls can be done using a barbell, EZ curl bar or dumbbells. 

Preacher curls are properly executed by beginning each repetition from a position where the arms are fully extended and a stretch can be felt in the biceps muscles. 

The weight is then curled up to where the biceps muscles are fully contracted then lowered to the starting position.  Each repetition should be performed beginning with fully extended arms to a position where the biceps are fully contracted. 

For the best results in developing the lower biceps area, the weight should be controlled through the entire range of motion with extra emphasis on the negative portion of the movement.  The backs of the arms should remain in contact with the bench at all times and the weight should never be swung or cheated up.

The problem with preacher curls is that it is easy to cheat when the set becomes challenging and when the lactic acid burn sets in it takes an incredible amount of determination to fully extend the arms, the most important part of the exercise. 

Also, many gyms do not have free weight preacher curl benches and members are required to improvise by using other devices that my not yield the most desired results.  Free weight preacher benches that are found in gyms are sometimes unavailable or are used too often by others. 

This can prevent you from reaping all of the benefits of preacher curls as it’s best to perform several sets in rapid succession. 

For the best results, three to four sets of 10 to 15 repetitions should be completed through a full range of motion with a moderate weight and no longer than 60 seconds between sets.  Because the biceps are a relatively small muscle group, preacher curls can be performed several times per week.  For best results they should be done every other day. 

Arm Blaster Curls

Best Arm Blaster Curls

Arm Blaster curls are performed by using a unique device that helped Arnold Schwarzenegger build his world famous, mind-blowing biceps. 

The Arm Blaster is a small, inexpensive, lightweight device that helps you perform preacher-like curls and build full, well developed biceps quickly.

The Arm Blaster is designed to help you keep your arms tight against your body while doing standing curls.  The barbell curl is perhaps the best exercise for building overall thickness, density and biceps muscle size.

The Arm Blaster allows you to take advantage of the powerful muscle building aspects of the barbell curl while keeping your arms in a position that will cause explosive muscle growth at the bottom of the biceps where they are most visible. 

Arm Blaster curls will help develop that thick, full look of the biceps just above the forearm.  When you wear a short sleeved shirt there will be no question that you possess a huge set of jacked biceps.

If you have small, slender lower biceps it doesn’t matter what their measurements are or how big they look under your shirt.  You need to have big, thick, full lower biceps to give the appearance of huge arms. 

My opinion is that Arm Blaster curls are far superior to any other exercise, even preacher curls, for making the biceps look bigger and developing large, muscular arms. 

The Arm Blaster is incredibly inexpensive, lightweight and small enough to fit in any gym bag.  Arm Blaster curls can be performed at home, in a commercial gym, at work or anywhere you can perform a curling movement.   

Arm Blaster curls are so effective at creating the much sought after appearance of big, muscular biceps that they should not be left out of any arm building workout program.  To do so would limit the awesome growth potential that Arm Blaster curls provide and reduce the opportunity to make the biceps look bigger and more muscular quickly.

Get your Arm Blaster using my Amazon affiliate link here.

Check out Renaissance Periodization's Scientific Principles of Hypertrophy Training here. 

*Please note that if you make a purchase using any of the affiliate links included in this post, I may receive a monetary commission.

Also Read:

What Are Considered Big Arms?

Big arms tight shirt

Do You Have Big Arms?

If you’ve already built what you consider “big” arms or are interested in what is considered big biceps or triceps, read on. 

So, are 16 inch arms big? Are 15 inch arms big? What about 17 inch arms? What are really considered big arms?

As detailed in Everything Big Arms, What Are Considered Big Arms 2.0, this post will answer the age-old question, "what are big arms?"

Optimal Symmetry 

Traditionally, the ideally symmetrical measurements of the male physique include equal circumference of the neck, upper arms and calves.  

In a popular example, the most impressive display of symmetry and proportion is a man whose neck is 17 inches in circumference, whose upper arms are 17 inches around and who has calves that measure 17 inches. 

17 inch armsConsidering the fact that few people develop muscle mass at the same rate all over their body makes the pursuit of the “ideal physique” extremely challenging.  

Sure some people will be able to achieve these measurements relatively easily.  

But the majority of drug-free, natural bodybuilders and fitness enthusiasts will find it difficult to bring all these three body parts to a point of simultaneous identical measurement.

In this article, I will explain what is commonly considered big arms, big biceps or large upper arms.  There are several variables to consider when determining if you have what could be considered big arms. 

How to Measure Your Arms

For the purposes of this article, upper arm measurements are established on a cold, flexed upper arm with a measuring tape.  The term cold means no pump in the muscle or at lease twelve hours after a workout.  

The best type of measuring tape to measure the arms does not stretch over time, provides a consistent result when dry and moist and can easily stay in place while positioning it on your arm.    

Body composition must also be considered when comparing arm size.  A person who carries a lot of fat can easily achieve large arms because of the volume of fat tissue that is beneath the skin. 

On the other hand, a lean, muscular person could have such a low body fat percentage that the tape measurement is relatively small.  For our determination of how big is a big arm, we’ll use the example of a fit person who has a body fat percentage of about 15%.  

You can determine your body fat percentage easily at home with the Omron Fat Loss Monitor. Get it here. (affiliate link) Consulting an experienced certified personal trainer or fitness coach is a good option to explore the best ways to drop fat and build muscle.

15 inch arms
To measure the upper arms to determine their size and circumference, flex your biceps as if you were showing off how jacked you are. 

Take your measuring tape and wrap it around the largest part of the upper arm.  

This will vary from one person to the next but many people find that the upper arm is largest just off center toward the shoulder.  

Make sure the measuring tape is straight around the entire circumference of the arm and not crooked as this will provide an inaccurate result. 

what do 19 inch arms look like
Pull the tape measure tight enough against your arm so that the entire tape measure is in contact with the skin but not so tight that it presses into your skin. 

Place the end of the tape measure closest to the one inch mark against the measuring tape so that the side edges are aligned.

The end of the tape measure will line up with a measurement, for example 16inches.  This is the size of your upper arm.  

What Are Considered Big Arms?

Now that you’ve established what your upper arms size is, compare it to the following breakdown and see where you stack up:

11–12 inches – Small arms.  You’re either a prepubescent girl or very new at this. 
13-14 inches – Moderately small arms.  You’ve got a long way to go to big arms.
15-16 inches – Decent size arms.  You’re muscular but could have bigger arms.
17-18 inches – Muscular arms.  Your arms are well developed and look impressive.
19-20 inches – Big Arms.  You’ve acquired the elusive big arms!
21+ inches – Massive Arms.  You’ve surpassed big arms and are simply huge.

Congratulations if you fall into the Big Arms or Massive Arms category.  If you fall into a category that indicates that you have some work to do in the area of arm muscle development, you may want to read the following articles:

Also Read

Wrist Leverage Bar Review: Build Big Forearms Fast

Biggest forearms

The Wrist Leverage Bar is quite possibly the best piece of equipment to build big forearms fast with ease and convenience. 

In the paragraphs below I’ll give a review of a massive forearm builder: The Wrist Leverage Bar, found at this affiliate link.

Build Big Forearms Fast

The wrist leverage bar is designed to target and isolate the muscles of the forearms.  

The device exploits an uncommon mechanical disadvantage by forcing the largest, most growth-prone muscle fibers of the forearms to work and grow. 

How It Works

The wrist leverage bar is 18 inches long with a thick, deep knurled handle for maximum forearm activation.  The bar is best used to develop mind-blowing forearms by performing two unconventional but simple exercises: leverage bar curls and leverage bar Thor’s hammer.

These two movements performed with the wrist leverage bar are not widely known or understood.  That is why it is so uncommon to see people with large, well-developed forearms! 

See, most bodybuilders, athletes and fitness enthusiasts don’t understand the how powerful the action of putting immense, targeted stress on the major muscles of the forearms is for building big, strong forearms and wrists.  

No other piece of equipment so effectively targets the muscle fibers of the forearms.

The idea is to place enough stress on the muscle fibers of the forearms by isolating the muscle group by regularly performing wrist leverage bar curls and wrist leverage bar Thor’s hammer.  

If your forearms haven’t been growing, you haven’t been doing these two exercises.

Developed Forearm Muscle

See, the most common forearm exercises such as wrist curls and wrist rollers only target the wrist flexors and wrist extensors.  

These muscles are relatively small and generally won’t grow large enough to make the forearms bigger or more muscular.

The key is to target two of the largest forearm muscles that are prone to growth and will the make the forearms massively large and muscular.  

These two muscles are best targeted by performing two specific exercises with one unique device.  

In order to make your forearms big and muscular, you must place adequate stress on the brachioradialis and pronator teres muscles.   These muscles are tough to isolate as most exercises that target these muscles are larger, compound movements.  

Leverage Bar Curls

Leverage bar forearm training

Wrist leverage bar curls are the best exercise to build big forearms.  This exercise is performed by taking hold of the handle of the leverage bar with your palm facing the outside of your thigh.

The bar is lifted from the downward position straight out using only the muscles of the brachioradialis by keeping the elbows locked. 

Once the top of the movement is reached, the bar is lowered under control to the starting position.  Performing three sets of leverage bar curls of 10-15 reps with a leverage bar will give you the biggest, most unbelievable pump you’ve ever had and burning sensation deep within the forearms.

Doing this exercise three times per week will result in rapid, noticeable growth of the forearms.  No other exercise performed with any other device will cause this type of rapid muscle growth of the forearms. 

Wrist Leverage Bar Thor’s Hammer

Lower arm muscles

Wrist leverage bar Thor’s hammer is a movement that places stress on the pronator teres muscles.  When well developed, this muscle group will give the forearms a dense, thick appearance. 

Developing this muscle is very difficult by any means other than by performing wrist leverage bar Thor’s Hammer.  If you see a person with large pronator teres muscles, then you know they are jacked and have strong wrists and a solid grip. 

This much sought-after growth is enjoyed by few because so few know how to target this muscle group!

This is serious stuff, fellow muscle enthusiast!  By using the leverage bar to perform Thor’s Hammer, your forearms will become thick, dense, large and muscular very quickly.  People will notice.

Thor's hammer exercise

The Wrist Leverage BarThor’s Hammer exercise is performed by holding the arm at a ninety degree angle against the body, with the forearm parallel from the floor and holding the handle of the wrist leverage bar in your hand. 

By twisting only the wrist, the pronator teres muscles rotate the bar approximately one-hundred-and-eighty degrees.  Performing three sets of 10 to 15 full repetitions three times per week will quickly give your forearms a thick, dense appearance.

Convenience and Portability

The length of the wrist leverage bar, 16 inches, is ideal for placing the appropriate amount of stress on the forearm muscles for maximum growth and development.  It is also the perfect size for carrying in your gym bag, storing in your gym locker or even in your desk at work. 

Big forearm exercises

The wrist leverage bar weighs seven pounds, which is light enough to carry around with ease but just the right weight to allow you to perform wrist leverage bar curls and wrist leverage bar Thor’s hammer with a light to moderate amount of resistance.  

The bar is designed to hold plenty of standard plates, but you will find that the weight of the bar itself is enough to stimulate awe-inspiring growth of the brochioradialis and pronator teres muscles.  

Structure and Durability

The wrist leverage bar is made of light-weight, sturdy steel and is chrome plated for protection and cleanliness.  The device is heavy-duty enough to withstand heavy use and can endure years of relentless abuse. 

The wrist leverage bar comes with a chrome steel collar to lock on additional plate weights for even greater muscle growth and development.  The bar is designed to hold standard plates, which may be uncommon in some commercial gyms, but can still hold Olympic plates just fine.  Olympic plates will fit somewhat loosely on the bar, but can be secured by adjusting the collar locks to fit securely against the weight. 

Cost

The cost of the wrist leverage bar is incredibly reasonable considering the profound impact it has on the development of forearm muscles.  Many people spend hundreds of dollars on worthless pieces of equipment, supplements and gym memberships just to build a set of big, muscular arms.  The fact is, just this device will build such incredible amounts of forearm muscle that the price will feel like a steal. 

Where to Buy the Wrist Leverage Bar

I have grown to love and trust Amazon.com for fast, easy ordering of fitness equipment.  The wrist leverage bar is available at Amazon and qualifies for free shipping and certain credit card rewards points can be used to purchase the device.  Also, Amazon can direct you to useful, helpful products and literature to help you in your quest for huge, powerful forearms. 
  
This affiliate link will take you directly to the wrist leverage bar.